Attic Gal Rachelle says:
My twins have been enthralled with the Hunger Games books, so for their 13th birthday they wanted to have a Hunger Games party. Having really enjoyed the series myself, I was game! And the nice thing about 13 year olds, is that they can do so much to help plan their own party. For months they put their heads together and came up with some crazy ideas, but this post shows what we eventually came up with. It just turned out awesome!
This is the invitation. It was printed on card stock, and folded like double doors and secured with black tape. On the front were the words "Happy Hunger Games." They actually invited 12 girls and 12 boys, in hopes of getting a full 24 tributes, but their birthday was after the last day of school so it ended up being more like 14, which was plenty.

I usually go all out for decorations and food, but this time I decided that this party was all about the activities. Besides, these are the Hunger Games, so we wouldn't want anyone getting too full, right?
I kept the snacks simple and relevant to the theme: rustic bread with goat cheese and apple slices, bowls of flaming' hot potato chips and flaming' hot Cheetos, and cinnamon fire jelly bellies.
We also had plenty of water bottles and planned to pick up pizza to take the arena after the actual games at the end.
The decorations were simple too: just a little bit of crepe paper in yellow, orange, red, and black, and a few HG posters that we picked up at Walmart. The parachutes are just made from cheap basket planters that I found for less that $2 each at Walmart too. We just removed the filler, turned them upside down, and covered them with foil. We hung them with fishing line from the ceiling fan, and hung small loaves of bread and a tin to represent medicine on them. Super cheap and easy, but the kids got a kick out of them.

Of course, the real show stopper was the cake! It was covered in chocolate frosting, and chocolate candy rocks were stuck all around the sides. The campfire loge are cookies and the flames are made from melted yellow butterscotch and red cinnamon candies - the cheap ones. I melted them separately on the stove (be careful - it will burn and darken quick if you are not careful) and then poured and swirled them together on a Silpat. When it is cool and hard, I broke it into pieces and put it on the cake with the largest pieces in the middle. Those little red bumpy peanut candies are tossed in the middle to look like embers and the arrow was made with a skewer and a couple of small laffy taffys that were softened in the micro for a few seconds to make them soft so I could mold them with a butter knife. I just moistened the edges to stick them to the skewer. The bumpy peanuts and chocolate rock candy were in bulk at Winco. It made a great center piece when we finally blew out the candles, all the kids were clamoring for the flames, of course!

The first thing we did when the kids arrived was have everyone register for the reaping. I made these little slips of paper where they signed their name and used a red ink pad to give us a "blood" sample thumb print. Then they were folded and secured with black tape. Black tape was hard to find, so I had to resort to trying to cut up black duct tape. That was not very effective and messy, so see if you can find some actual black tape somewhere. I had two jars, one for girls and one for boys, of course. I also gave everyone a name tag, because everyone did not know everyone, and for some of the activities, it would be important for the kids to know each other's names.

And then it was time for the reaping! I, of course, had to dress up like Effie Trinket! My boys loved the silly lipstick, but complained that my hair was neither pink enough nor big enough. Well, we can't all be as perfect as Effie, can we? I jet went in my closet and layered on anything fluffy and frilly in pinks and purples.
To do the reaping, I announced a district, then picked a name for a girl and then a boy to represent that district. Since we didn't have enough kids for all the districts, we picked districts 1-5, then skipped to 11 and 12. When the tributes came up they were given a token from their district to wear. (The picture of the tokens and how I made them are further down this post.)

Immediately after the reaping, of course, it was time for the stylists to make costumes for the tributes representing their districts! We had each district team decide which would be the stylist, and which would wear the costume. This idea came from the old wedding shower game where you make a wedding dress out of TP, but my boys had a better idea, and along with the TP they just scrounged around the house for some other interesting elements to make costumes out of - stuff I never would have thought to use - and dumped it all on the table: foil, pipe cleaners, colored tape, trash bags, duct tape, paper bowls and plates, paper clips, whatever. Those kids got very creative, and it was a ton more fun than just TP! I doubt Cinna himself could not have done better.
The stylists got 10 minutes to dress their tributes, them we paraded them out and voted on our favorites.
And after the costumes, come the interviews with none other than Caesar Flickerman himself. One of my older sons was happy to play Caesar. He wore a tux and slicked his hair back into a (tiny) pony tail, and we sprayed it blue. We played a game similar to "I cannot tell a lie." Each tribute came up, and Caesar asked them a question about some totally outrageous or silly thing that they supposedly do, like "So I understand that when you are really nervous, you chew on
other people's fingernails. Tell me about that?" The tribute cannot laugh or break character, and they have to answer the question as if it is true and then elaborate on it, explaining why they do whatever it is, even giving a demonstration. It was pretty hilarious. If you laughed or broke character you were out, and everyone voted on the winners at the end.

The prizes for all the games were smaller toy "weapons" I picked up at the dollar store: guns with suction cup bullets or ball bullets, cans of silly string, ball "grenades", etc, whatever you can find. I tried to pick everything in orange or red if I could. I put them all in white paper bags and closed them with more black tape. The winners of each came could pick a bag without looking inside first. Once they picked it, they could look inside, but we recommended not telling the others what weapon they had, because they would be able to take the prize into the arena with them to use against the other tributes in the games. (The silly string was a HUGE hit, BTW!)

Here are the district tokens I mentioned earlier. I found an image online that had the seals for the 12 districts, sized it to my liking, and printed it out. Then I glued the whole sheet well to a piece of heavy cardboard and cut out the tokens. I used Stampin' Up!'s Crystal effects on the fronts to make them shiny (or you could use epoxy or something like that) and stuck pin backs to the back. They turned out pretty cool.
After the interviews, it was time to start the training. We had 4 activities planned for the training portion. The first was identifying poison berries. We took some fresh raspberries and into the hole of just a few we sprinkled a tiny bit of sugar, and into all the others we sprinkled a tiny bit of salt. Then we placed them individually upside down in these plastic shot glasses from the dollar store. The kids each selected one and at the count of three they all ate their berries and the ones who were still smiling had avoided the poison berries and won a prize.

My boys made up the next training activity that they called Career Dodge-Grenade. The tributes from districts 1 and 2 stood behind a squiggly water-spraying thing hooked up to the hose. they had buckets of water balloon "grenades." All around them on the ground were backpacks and bags of various sizes, and the other tributes had run from one side of the yard to the other, trying to rush up and grab a backpack without getting pelted with a water balloon. And what was in the backpacks that the tributes so badly needed? Well, towels, of course! They had fun with this one and kept putting the backpacks back and trying to get them again until all the grenades were gone.

The next game was called Tracker Jacker Tag. First we had the girls be the tracker jackers that chased the boys, then the boys got to be the tracker jackers in the next round. Tracker jackers were each given a few sheets of simple circle stickers and had to run around chasing the tributes putting as many stickers on them as possible! At then end of each round, the tribute with the fewest "stings" won a prize.
This was a fun, fun game, and super easy to put together, and I personally loved the colorful dots stuck all over everyone for the rest of the party.
The last training activity was decorating Peeta's Camouflage Cookies. We printed off images online of things in nature like various kinds of bark, grass, ground cover, and cracked mud, and put them on the table for reference. We made a bunch of frosting in earthy colors of browns and greens. Everyone got a big sugar cookie to try to camouflage as best they could. They had so much fun with this activity, and then everyone got to either eat their cookie or take it home - after the judging, of course.
For the rest of the activities, we had to actually drive to another location, so this is when we took a break and sang Happy Birthday, blew out the candles (that fire cake looked AWESOME lit up with candles, by the way!), and opened the gifts. Then we all piled into the cars to be transported to the "arena," a large piece of empty property we own about a mile away.
But before the games could begin, we had one more training session. My dad set up an archery range on the lot and the tributes got to try their hand at shooting real arrows with real bows, at what else? Bags of apples! This was great fun for everyone!!! They really came to appreciate Katniss' skills after that, I think!
We had our older boys and some friends act as the gamemakers, using a megaphone to give instructions, and starting the game and announcing tribute deaths with a tiny little cannon (actually a confetti gun we found at the party section of Walmart.)
We have a big ditch on our property, so we put our cornucopia (a tent) down in the ditch and filled it with, and spread around outside of it, all sorts of toy weapons, some smaller ones like the ones in the prize bags, and many larger ones like swords, flying discs, pool noodles, punch balls, and even two awesome nerf-type bows and arrows that would actually be gifts for the twins when it was all said and done.
In order to make things fair, we had the big glass jar with all the tributes' cards with their names that we use in the reaping. We had everyone draw a name and that was the name of the tribute they had to kill. When you killed that tribute, he would give you the card with the name of the person he was supposed to kill, and then you could go after that tribute next. You could only kill someone if you had their card, or if they try to kill you, you can kill them in self defense. But this cannot go on this way forever, because someone might get themselves, etc, so after about half of the tributes were killed, the gamemakers made an announcement via the megaphone that it was now a free for all, and any tribute could kill any tribute.
The tributes were also given clip-on flag football flags to clip on. You killed someone by taking their flag. They were all arranged in a circle around the cornucopia with their backs to it, ready to begin the Games!
When the cannon was fired, they all could turn around and grab whatever weapons they could and take off and play the game. Crazy!
It was really fun, and the kids really got into it. After all, this is what they had been waiting for - to participate in the Hunger Games!
When the games were done and we had our champion, there was just enough daylight that some of them decided to play it again. Others did some more archery, and we had pizza ready then too.
Originally, we had planned on having a "feast" in the middle of the games, and have the tributes have to come back to the cornucopia to grab a bag labeled with their district number, but we ran out of time and the arena was so big that it wasn't feasible to make the announcement, so we just spread the bags around the cornucopia for them to get after the games, which worked just fine.
I found the orange fabric bags at the dollar store in sets of 2. We filled them with supplies of Pop Rocks, Slim Jim fire sticks, pixie sticks, Atomic Fireballs, peanut butter and cheese crackers, and Sleep Syrup which was just re-labeled small bottle of Hawaiian Punch or orange Gatorade. They also got to keep whichever smaller or dollar store weapons that they acquired.
We live in a HOT place, and the birthday was in June, so we had to start the party as late as possible so it would be cooler to be outside, but still early enough to get it all in before dark. We started the party at five and it was over by eight, so we had 3 hours. We timed it pretty well for the most part, but if I was planning the party under better circumstances, I would plan more time because we had to kind of rush things and the kids were still having fun when it got dark and we had to pack it all up (in the dark - not fun) and go home.
Overall, it was a really fun party, and my boys and all the guests had a blast. They really felt like they were tributes in the Hunger Games! It was a fun party to put together.
If you decide to throw a Hunger Games party, have fun with it, and may the odds be ever in your favor!


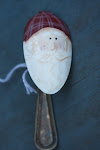
 And then on Easter Sunday, we always make a lamb cake. I have had this lamb shaped cake pan for years, but was intimidated by it. A few years ago I did this, and I thought it turned out darling. I baked a devil's food cake, and piped on vanilla frosting in big loose swirls everywhere but the face and ears. I sprinkled green coconut "grass" all around her. The flowers are made from large marshmallows that I snipped in half with scissors and sprinkled with colored sugars which only sticks to the cut parts. The leaves were made the same way. The centers of the flowers are my favorite Easter treat - Cadbury Mini-Eggs. Very easy and such a pretty way to finish off our Easter meal!