Sunday, May 31, 2009

A Little Lit with the Ladies

Attic Gal Rachelle says:
I have been busy entertaining this week!  On Thursday evening I hosted our book club.

  We read "These is My Words" by Nancy E. Turner.  It is the story of a woman named Sarah Agnes Prine and her adventures in the frontier of the Arizona Territories in the 1880s and 90s.  A terrific read!!!


The weather was unseasonably lovely so we met outside, which was perfect!  For ambiance I brought out my old trunk  found out saleing (remember this post?) and filled it with old quilts and draped it with my 1880's crazy quilt (see this post).  I added some old books, and a jar of homemade soaps - all of which are very important to the story of Sarah Prine.

It only took minutes to gather everything from the house, but really added to the evening, I think.


Food was simple too.  I used an old quilt for the tablecloth.  I made some pecan pie in honor of the pecan grove they had in the story.  Here is the recipe for my AMAZING and super easy pie.

Honey Crunch Pecan Pie

Pecan filling:

4 eggs
1 cup light corn syrup
1/4 cup packed brown sugar
1/4 cup sugar
2 Tbsp. butter, melted
1 tsp vanilla
1/2 tsp. salt
1 cup pecans, chopped

Crunch topping:

1/3 cup packed brown sugar
3 Tbsp. honey
3 Tbsp. butter
1  1/2 cups pecan halves

Preheat oven to 350.  For filling, in medium bowl mix eggs, corn syrup, brown sugar, sugar, butter, vanilla and salt.  Stir in chopped pecans.  Pour gently into prepared crust.  Bake 35 minutes.  When pie is baking, prepare topping.  In a small sauce pan, over medium heat, combine brown sugar, honey, and butter.  Cook 2-3 minutes, until sugar is dissolved, stirring constantly.  Stir in pecan halves.  When pie has baked 35 minutes, take it out of the oven and gently pour  topping over pie.  Return to oven and bake about 10 minutes longer.  Cool and serve.


I also served warm homemade bread, with homemade jam, Cox whipped honey brought straight from Utah by Tara, and my dear friend Shari even made homemade peanut butter!  There really is nothing better in this world than warm, homemade wheat bread with homemade jam, farm fresh honey, and homemade PB!  Heaven.  Really.

We had a great discussion.  For fun, I found 25 of my favorite quotes from the book, put them in a basket, and everyone picked a few they liked, and took turns reading them for the basis of our discussion.

We had a great literary chat, and everyone agreed it was a really terrific book!

Are you in a book club?  What have been some of you club's favorite reads?

If you are not in a book club, join one or start one.  It's easy.  I love having an excuse to sit down and read something besides Dr. Seuss,  and then get together with such neat ladies each month.

Happy reading!

Sunday, May 24, 2009

Glass Etching: a Tutorial

Have you ever tried etching glass?  It is remarkably easy, and the results are impressive.

I first etched glass when I was about 11 years old.  I made Christmas ornaments out of little glass squares.  They turned out great, and my mom still hangs them in her tree every year.


First, you will need etching cream.  You can probably get some at your favorite craft store.  They didn't carry any at our JoAnn, but they had it at Michaels.  At our store they kept it locked up, so be sure to ask a clerk if you can't find it.

Etching cream is rather pricey.  This is the medium size bottle and it was $27.  But I'm no dummy.  When I saw the price at check out, I ask the lady to put it back and I came back two days later when I had a 40% off coupon.  Love those 40% and 50% coupons!  But if you just want to try it, they sell a small bottle for about half that price, so you don't have to make a huge investment to get started.

You will also need regular clear contact paper and a non-metal tool like a tongue depressor, popsicle stick, or plastic butter knife to spread the cream.

When it comes to the glass, usually the cheaper the better.  Anything treated or tempered usually won't work.  I got those pretty square plates at Target after Christmas for 75% off.  The box was Christmasy, but the plates weren't.  I found that jar at a garage sale.  The dollar store is also a great place to find glass to etch.  You can also etch mirrors, glass in picture frames, etc.  Use your imagination!

First, you need to cut your contact paper into a stencil.  I used my Big Shot.


Carefully stick the stencil you made onto the glass.  Remember, you use the negative.  The cream sticks where the stencil isn't.  The contact paper protects the glass from the cream.  Be sure to press down the edges really well so the cream doesn't seep underneath.


Spread the cream over the negative space in your stencil.  You don't need a ton, but just enough to make sure it gets good coverage.  Be very careful not to get any off the edge of the stencil onto the glass because it will etch any glass it touches.  Also be very careful not to get it on you skin or in your eyes.  If you do, rinse immediately with water.

All the directions are on the bottle.

Then comes the easy part - just wait 5 minutes...


Then rinse it all off with water.  Make sure you get it all off.  Be sure not to rinse it off in a porcelain sink (at least not a lot of it).  Do it in a steel sink, or outside with the hose.


Peel the stencil off to reveal the image.  It will look better as it dries.


See what I mean.  Easy.


But I am Attic Gal Rachelle, so I couldn't just stop there. I was just getting started.  I die cut a bunch of butterflies. 

If you don't have a die cut machine, you can use punches, or even an exacto knife to cut your own stencil.  You can also use tape to make stripes, or the negatives of sticker sheets.  Use your imagination!  Just remember that you need the negative of the image.


Then I followed the same steps.  1) Stick on the stencils

2) Apply cream  3) Wait 5 minutes  4) Rinse

TaDa!  My butterfly jar is complete!  Isn't that cool?

Really, the possibilities are endless. 

Etch away, ladies.  Etch away.


Stamp Swap

Last week was the last Stampin' Club class of the series that I have at my house each month.  As tradition, I have each stamper bring a swap - 6 identical cards to trade with the other stampers using techniques learned over the last 6 months at our club.

Here are the swaps:

My dear friend Dayna made this sweet card.  It says "to thy own self be kind."  She said that as women we do so much for so many, and thinks we need to stop and be good to ourselves sometimes.  So true.

The flower is raised and lightly watercolored.


Same with the inside.  So pretty.


April made this delicate card. The large image was embossed with Versamark and detail clear powder.  It is very fine and pretty.  Then she cut it into thirds to make the panels.  I love the rhinestone brad in the center of the flower.


Suzi made these sparkly little pocket notes. The picture doesn't do it justice.  The starfish was watercolored with blues and browns, then embossed over with a clear glaze.  Then she glued two different color blue glitters on - one around the edge and a lighter glitter as the rays extending from the middle.  Then she topped it off with a little pearl.  So pretty!


Mom made this card.  It is very simple, but the surprise comes on the inside.

When you remove the belly band, the card opens and looks like this:


But then the card opens more revealing this hidden inside:

This card is kind of woven together.  It is very clever and a fun card to handle and play with.

Here is my card.  Again, the picture doesn't begin to show you the glory of this card.


It is hard to see it but the rose is sparkly.  I embossed the rose onto white shimmery cardstock with white embossing powder.  Then I sprayed it with water so it was really, really wet.  The with a small paintbrush I dabbed orange and yellow re-inker inks into the pools of water for a blended watercolor look.  The color comes out so bright when it dries, and the colors stay in each petal because the embossing acts as a dam to keep the color inside.

The background is dry embossed using a embossing template with my Big Shot.  The leaves are also die cut with the Big Shot.  I love the striped grosgrain ribbon.


I also also gave everyone an etched glass plate I made using the "Tulipe" die cut and etching cream.  If you have never etched glass before it is way easier than you'd think.  I will do a tutorial for you later today, OK?

I just added a little die cut butterfly to the plate just for fun.

Everybody did such a great job on their cards!  What a group of creative and talented ladies!

Sunday, May 17, 2009

A Pocketful of Posies!


On Wednesday I threw a mother/daughter dinner for the young women from  our church in my backyard.  It was really a great evening, and the theme was flowers.


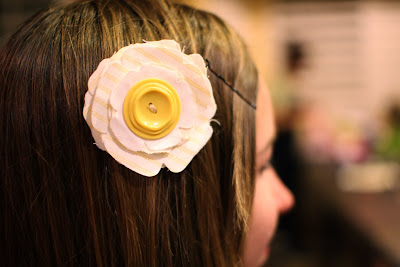
For a craft we made pretty fabric posies with a huge pile of different fabrics and a two gallon tub of old buttons that I am proud to own.  I just love old buttons!  My kids will dig through that tub for hours finding their favorites.  

We simply ran the fabric through my Big Shot die cut machine, with a few of my Bigz flower dies, then they sewed them together with the button using a needle and thread.  They got to choose between putting their flower on a hair clip or a pin back.  The girls made flowers for their moms and vice-versa.

Here are a few of their creations:


They are super cute in the hair, but you can pin them on a hat, purse, or jacket.

I put my toile posie on the fun polka dot bag my mom gave me for mother's day, and included the red ribbon the gift came wrapped in.  Love it!

Everybody's flowers turned out darling!  And after they all left, I just couldn't put all the fabric and buttons away without making a pocketful of posies of my own:

Which are your favorites?


I love the yellow and blue toile of course, and the yellow striped one is just sweet.


Black and white is always a great combo.

Hee Haw!  The denim  ones are just fun!

The orange one is one of my favorites.  I really like the monochromatic flowers!

Show a little posie patriotism for the 4th.

The pink and brown one on the bottom just makes me happy, and the bright pink with pinstripes and bling is very classy, don't you think?

But the natural muslin one on the bottom is my favorite I think, and the brown velvet one above it is simply luscious!   I am going to have so much fun with these.

Try making some posies of your own with some scraps of fabric.  I liked the heavier weight, textured fabrics best.  If you don't have a die cut machine, you can always trace a pattern and cut them out, or even freehand cut them.  I really don't think you can go wrong.  Just have fun with it!


Wednesday, May 13, 2009

Who's Turn Is It?

Attic Gal Alysa says:


Do you ever have those times where children are fighting for the front seat of the car or who goes next in a game? Here's a fun solution that our family uses. The Cube. Last summer I made this while I was traveling with my children without my husband. I needed it for my sanity as I knew the children would be fighting for seats, music, food, etc. As you can see mine has had a lot of use. I need a new one for this summer and beyond. (I think the next one I make I'll include Attic Gal Rachelle in on the fun and we'll come up with something really wonderful. )

Just take a cube of wood and either modge podge pictures onto it or tape it. I taped the outside of the whole block just because I couldn't find the modge podge at that time. If you have too many children for the 6 sides, double them up or if you have less, put their face on there a few times. You can add parents, grandparents, friends, whomever you want.

This works for our family and takes the blame off me and onto the cube :)

Sunday, May 10, 2009

Create!

Attic Gal Rachelle says:

I hope you'll take a moment to watch this short clip.  It encapsulates perfectly my beliefs about creativity - that we all have a need to create, to bring into existence something that hasn't been before, and would never exist without you putting it there - whether it is a piece of artwork, a special meal, a letter to a friend, a photograph, or a smile on another's face.  That's why I do this blog.  If I can do anything to inspire anyone to use the creative power inherent within them, I will be happy.

You ARE Creative!

Enjoy!


Thursday, May 7, 2009

A Few Stamped Projects

Its has been a busy month of birthdays and such, and I have taken a few pictures of some of the stamped projects I have done.  Here is a quick peek.

My friend Denice had a birthday, and I gave her an apothecary jar filled with layers of blue and gold wrapped candies to match the designs that were already on the jar.  It reminded me of the ocean, so I made the tag with a a big sea shell and tied it with lots of pretty brown and blue ribbon.

 The matching bag contains a few large sea shells and some sand, so Denice has something summery to display in the jar when the candy is all gone (She has 4 teenage sons, so I knew that candy wouldn't last long!).

On top of the candy I placed a large starfish, just for fun.


My friend Jenie also had a birthday.  I gave her stamps, of course, and a big scallop punch.  I just decorated a bag, and made a funky topper and tag to match.  Also my signature roses in a milk glass vase.  I LOVE milk glass, and so whenever I find a milk glass vase (usually about a dime) at a garage sale, I snatch it up to give roses from my garden in.


Every month I have three ladies that I visit, and I like to always bring them a little gift, a very little gift (usually I only spend a dollar each).  I found my favorite fragrance at Bath and Body Works in little purse sized lotions for a buck each.  I quickly stamped and punched out little tags in black with gold swirls just for fun.


For our trip to BYU Women's Conference I made these darling notebooks.  I found the polka dotted books at the dollar store, then added a stamped label, a bit more stamping, and attached a ribbon bookmark.  The charms were parts of a bracelet that I had that broke and I never bothered to fix.  They worked out perfectly!


Finally, these are the Mother's Day cards I made for my out-of-town sisters and friends.  I love the Manhattan style flowers, and my new butterfly die for my Big Shot.  You can't see it from the picture, but the butterfly body is an adhesive strip covered in microbeads.