Sunday, May 30, 2010
Sans Frames
I'm linking today with Skip to My Lou's "Made By You Mondays". Be sure to check out their other great ideas.
Do you have an area in your house that won't accommodate frames? Or are you tired of never find the right frame or spending a fortune on them? Here's an idea for you.
I had that exact problem. I recently put white write-on boards on my wall. Above it is a narrow shelf. I tried putting framed prints up there but they soon toppled over and crashed to the floor. So here was the next best idea:
I've seen these ideas on other blogs such as here and other places (which I can't remember now) and thought I would give it a try.
1. Purchase your canvas. You can buy it at Michael's or Jo Ann's with coupons or buy a 2-pack at Wal-mart for $9.99
2. Print off your pictures. I decided to have my pictures printed to 11x14 from Costco. They have sizes as large as 16x20 or as small as 4x6. You decide.
3. Paint around the edges, if you want. Choose a color that either goes with the print or your home decor.
4. After the colored paint has dried, paint a bunch of Mod Podge on to the top of the canvas.
5. Quickly place the photo on top of the Mod Podge surface. Press over the picture so it adheres to the surface.
6. Once dry, turn it over and cut the extra picture that is laying over the canvas.
7. Turn the picture back over and Mod Podge over the print. That's right -- over the print. Believe me, it will come out of the fog and be clear again. Promise.
8. Once dry, set them up on the wall or wherever you want to enjoy them. It was such a fun and easy project to do that I went ahead and purchased more canvas and enlarged more of my prints. Just make sure you don't do what I did -- forget to edit your prints on Costco.com for the correct size. Ugh. Oh well. I can always reprint, right?
Until next time, this idea is out of the attic of my mind and "to do list" and now available to you. Enjoy!
Thursday, May 27, 2010
Steps, Stools, and Spray Paint
Attic Gal Rachelle says:
The Shabby Nest is having a Frugal Friday Linky party. Go over there and check her out. Here is my entry!
So a few weeks ago, I found this darling, but battered, bench at a garage sale for the low down price of just $2. The paint was chipped and cracked and the cushion was covered in a white vinyl faux leather. But is is sturdy, and around here, that is all that matters.
It is amazing what half an hour of my time and a can of black spray paint can do:
The paint job was pretty beat up, but I just LOVED the lines to this unusual piece. I got daring and sprayed it a bright red-orange called "paprika."
I simply put a piece from a vintage tablecloth right over the white vinyl cushion (it wasn't quite big enough,) and covered it with a clear vinyl.
I think it looks great! (and now my boys have no more excuses for not practicing.)
A few months ago I found these bed steps while out saleing. I guess people used these in the old days when their beds were so high.
The paint job was pretty beat up, but I just LOVED the lines to this unusual piece. I got daring and sprayed it a bright red-orange called "paprika."
There is nothing so quick or so satisfying as spray painting something!
So what have you got in you house that needs a little color? Spray paint. I'm telling you. Spray paint!
Tuesday, May 25, 2010
Nibble on the Word
We know that we are supposed to feast on the good Word of God, but what about just a nibble?
I saw this cute idea a long time ago somewhere. You can easily make little chocolate bibles/scriptures as a cute little handout for a lesson or something with Hershey's Nuggets and black cardstock. I simple cut the black cardstock in 1 1/2" x 2 1/2" pieces and glued them onto a gold wrapped Nugget with a glue stick. Before gluing it on, I wrote the title on with a white gel pen.
I am a seminary teacher (an early morning daily religion class for high-schoolers) and I made each of my students their own set of the books in the Book of Mormon to wish them good luck in our scripture chase competition on Sunday. They did a great job and I thought they deserved a little chocolate!
I was thrilled with how they turned out! Fun! So file this idea away in your head for next time you need a yummy little handout when you have to teach a Sunday School class or something like it.
Who doesn't like a little nibble before the feast?
Sunday, May 23, 2010
Swimmingly
This little snorkeler will go over swimmingly at any party. We've made it for the past two years to celebrate the end of school and beginning of summer. My children are already begging for it.
This recipe came from the Family Fun magazine.
Ingredients
* 2 baked 9-inch round cakes
* 2 to 3 cups chocolate icing
* Hershey's Kisses
* 2 green LifeSavers Gummies
* 2 blue M&Ms
* 1 piece red shoestring licorice
* 1 orange gumdrop
* New snorkel and diving mask, washed with soap and water (I found mine at the $1 store. They are too expensive elsewhere.)
Instructions
1.Layer and frost the cakes.
2.Unwrap the Kisses and place them around the top for hair.
3.Add the LifeSavers and M&Ms for eyes, a licorice mouth, and a gumdrop nose.
4.Remove or unfasten the strap (or cut it so it will lay flat) on the diving mask, then place it over the face and lay the snorkel next to the cake.
Happy Summer!
Saturday, May 8, 2010
Mums Moms Love!
Mum's the word!
They were very easy, but took a little bit of time. Just use kitchen scissors to cut colored mini-marshmallows in half diagonally and drop them directly into bowls of colored decor sugar. The sugar only sticks to the freshly cut part of the marshmallows. Then arrange them on frosted cupcakes, starting around the outside then circling into the middle. The stamens are tropical good and plenty.
Happy Mother's Day to all you wonderful "Mums" out there!
Give Mom a few fun flowers for Mothers Day.
Last week I had some ladies over for lunch. For dessert I made these adorable mum cupcakes!
They were very easy, but took a little bit of time. Just use kitchen scissors to cut colored mini-marshmallows in half diagonally and drop them directly into bowls of colored decor sugar. The sugar only sticks to the freshly cut part of the marshmallows. Then arrange them on frosted cupcakes, starting around the outside then circling into the middle. The stamens are tropical good and plenty.
They turned out super cute!
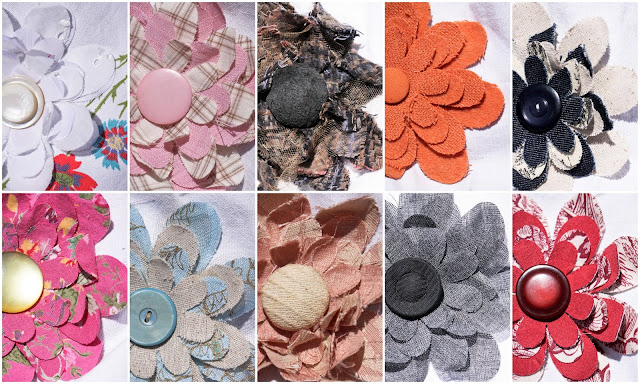
I have made fabric flowers with vintage buttons before, but this time I used my new huge flower die with my Big Shot! They are huge and so very fun to put on hats, purses, or your lapel!
Subscribe to:
Posts (Atom)